Circuit recognition · Guide 01
Castle Combe Circuit
Chippenham, Wiltshire
Circuit data
Locked
Noise limits
Cars
Published car trackday limits; confirm with your organiser.
Trackdays.co.ukCheck your booking and briefing: event limits and test procedures can differ.
Layout
Main
Length
1.850 mi / 2.977 km
Direction
Clockwise
Access
Permanent circuit
Circuit brief
Know the lap
Character
Fast and relatively simple on paper, with chicanes and high average speeds magnifying small mistakes.
Corner by corner guide
9 corners on Full circuit
Corner by corner guide
9 corners on Full circuit
Full circuit
Castle Combe is fast, exposed and less straightforward than its simple-looking map suggests. The big decisions come at Avon Rise and Quarry, but the smaller bends are what put you in the right place to tackle them.
- 1
Folly
The fast kink at Folly seems insignificant until you realise it decides where the car lands for Avon Rise. Open the entry so you can avoid having to make a sudden correction near the crest. You may find the shortest-looking line is not the most useful one in a heavier or lower-grip car, because it leaves you too far from the side of the circuit you need for the next bend. Start with the broad, forgiving approach and tighten it only after learning how your car settles.
- 2
Avon Rise
Avon Rise is as much about visibility and balance as outright speed. The road kinks while cresting, and the car can become light at exactly the moment you are thinking about the substantial slowing phase for Quarry. High-grip race cars may be able to carry a more direct line, but road cars usually benefit from preserving space and stability over the brow. Pick a braking plan that works when the suspension unloads, and never assume what looks like a straight approach on camera feels straight from the seat.
- 3
Quarry Corner
Quarry continues turning beyond the apex your eyes first suggest. Charge for that first visible inside edge and you are likely to be asking the front tyres for another turn while trying to accelerate. Give yourself an entrance that reaches further into the corner before clipping in; then let the exit onto Farm Straight reward the patience. The road is wide enough to disguise a poor entry, but the lost drive becomes obvious once the straight starts. Build speed carefully here, particularly in unsettled or damp conditions after Avon Rise.
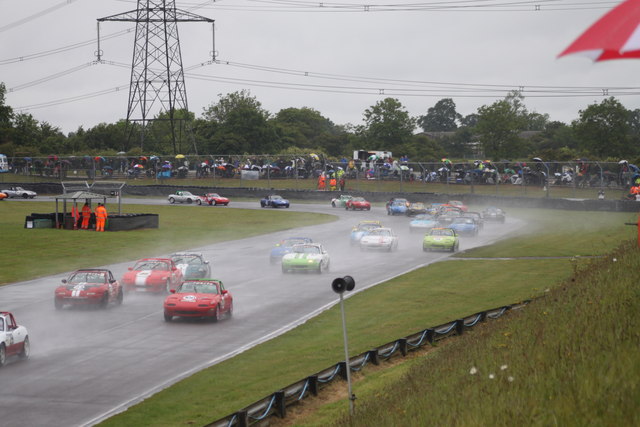
Photo: Michael Hill-King · MX-5s rounding Quarry Corner in wet conditions · CC BY-SA 2.0 - 4
The Esses
The Esses begin with a comparatively open change of direction and finish with the more demanding left. That difference catches people: it is easy to straighten the first part so much that the second part becomes impossibly tight. Take useful speed off on the approach, let the initial direction change happen without drama and preserve enough width to turn into the left without riding the outside edge on exit. What matters is a clean release towards Old Paddock, not how abruptly you can throw the car across the first apex.
- 5
Old Paddock Bend
Old Paddock arrives before the car has had much time to settle after the Esses. Your line depends on how cleanly you have exited that sequence and how much grip your car can genuinely use. Keeping a little more road in hand is often the sensible option until you are certain the car can handle a tighter route. The aim is to emerge with minimal steering effort as the circuit begins opening into the very fast middle section.
- 6
Howard’s Way (formerly Hammerdown)
The newly named Howard’s Way is the fast flowing bend that connects Old Paddock with Gooch’s. It may require no obvious slowing in a well-set-up car, but your trajectory through it has a clear purpose: reach the next braking area on the right part of the circuit, with the wheel close to straight. A lazy early apex can leave you correcting the car immediately before one of the more technical corners on the lap.
- 7
Gooch’s (formerly Tower)
Gooch’s asks for more patience than its approach suggests. The right-hander continues around beyond the first inside kerb and the banking falls away late in the bend. If you steer at the earliest inside point, the car begins drifting out just as the corner tightens and the barriers draw close. Keep the initial approach broad, look deeper into the bend and make the meaningful apex later. A tidy release gets you to Bobbies with a car that is still under control.
- 8
Bobbies and Westway
Bobbies is a right–left sequence with less room than the Esses, and the tyre protection around the first apex can hide where the useful opening really lies. Fixing your eyes on that obstacle tends to pull the line towards it. Look beyond the right, set up the left and let the car take power once it is facing down the next section. Westway that follows is mostly about flowing, economical positioning; be alert to any vehicle moving towards the pit entry.
- 9
Camp Corner
Camp looks like a final right-hander onto the straight, but the inside develops late and the wall on the outside leaves little margin for a mistake. Enter a touch too quickly and you either wait forever for the throttle or end up crossing too much road near the pit wall. Work back from an exit where the steering can open and the car can accelerate cleanly along the pits. In a lower-powered car, preserving that drive can be worth more than carrying a dramatic entry speed.
A guide, not tuition. These corner notes are here to help you get to know the circuit, not to replace a track briefing or advice from a qualified instructor. Lines, braking points and kerb use vary with your vehicle, experience and conditions on the day. Treat the suggestions as a starting point, build up at your own pace and always follow the flags, marshals and organiser’s instructions.
Trackday note
Noise rules are closely managed; check the limit attached to your booking.
Suitable for
Bikes · Cars
Circuit centreline derived from © OpenStreetMap contributors (ODbL). Layout visual is a navigation aid, not a safety or briefing document. Always follow the organiser and circuit marshals.
Private track journal
Personal notes
Sign in to rate this circuit and keep notes for your next visit.
Trackday tools
Log setups, tyre pressures and get paddock SOS help